When the pandemic hit the world, we were left with uncertain times. Due to the worldwide lockdown, many businesses could not proceed normally.
Many businesses made use of online services to conduct meetings. Skype and Zoom had a new group of people they started seeing downloads from.
Many schools used Zoom to conduct classes, so students could still complete their school programs efficiently.
Many of us have short attention spans, and you might have realized that you missed a few critical points in a Zoom meeting. But with a screen recorder, you could have re-watched the conference and caught up on what you missed.
But where can you find a decent application to record a zoom meeting? This article looks at all the best options for Zoom screen recording.
Let us dive right in.
How to Record on Zoom?
With a fantastic application like Zoom, it is no surprise that they offer their in-application Zoom recorder. However, you need the host’s permission to record Zoom meeting. Then all the participants will also see a recording icon once you start.
Tips: You may get interested in how to record zoom meeting without permission.
Nevertheless, the Zoom recorder is practical and easy to use. Then how to make a Zoom screen recording?
Firstly, you will need to activate the “Local Recording” option on your account if you have not done so already. Suppose you are unsure how the recorder works. Follow these next steps to enable Zoom recording.
- Sign in
Log onto your Zoom account as the administrator, and only administrators can edit account settings. If you are a participant, you need the host’s permission before moving on. - Go to account management.
Click “Account Management” in the menu and select “Account settings.” Under the settings tab, you will notice one that says “Recording” click on it. To a premium user, one will see a toggle called “Local Recoding.” Click Enable and select enable.
Secondly, you need to know how to start and end the recording of a Zoom meeting using this feature, and here is how.
- Start a meeting.
Once the meeting starts, you will notice a tool bar at the top of the computer screen. Click on the “More” > “Record” option to start the Zoom screen recording. It will ask if it should record the session, save it to your computer or the cloud, and select the desired storage location.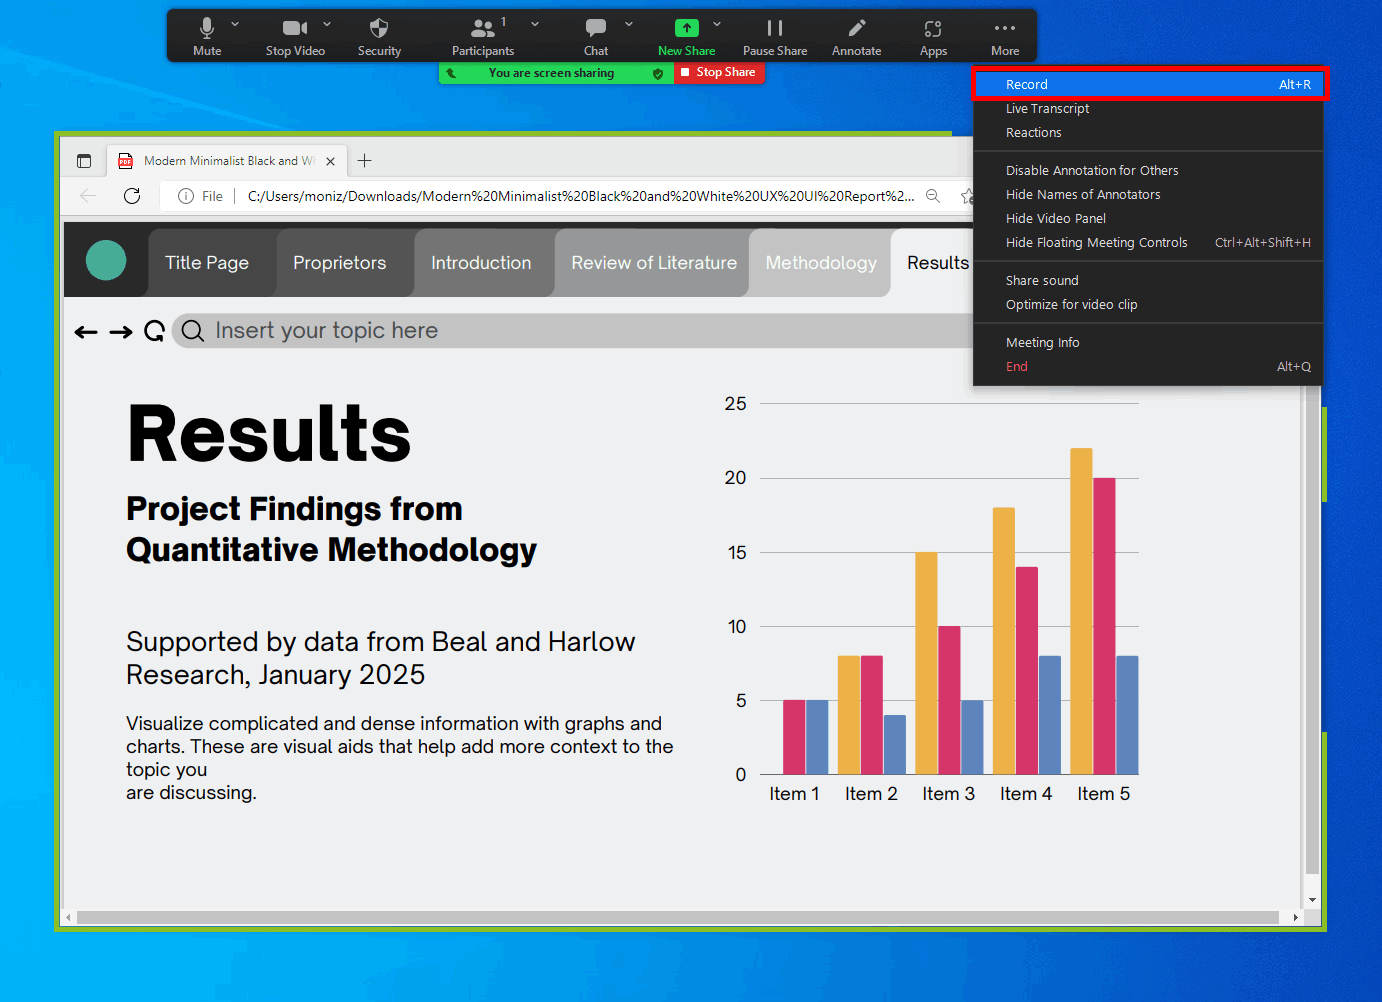
- Click record
You can pause the recording anytime by simply clicking on the pause icon. Once the meeting has ended, the Zoom recording will be automatically saved in the allocated slot on your cloud backup or your PC if you selected “Save to my computer.”
5 Easiest Way to Record Zoom Meeting
Many users are curious about will Zoom know if I screen record, can Zoom detect screen recording. The answer is Yes if you are recording on Zoom. And every participant can see the recording icon in the screen.
However, if you use a third-party app to do Zoom screen recording, Zoom won’t detect it. In some circumstances, you may want to do a Zoom screen recording secretly, or record Zoom screen as a participant.
That is why we have gathered a few options that will help you make Zoom screen recording.
Let us get started.
AmoyShare Screen Recorder
If you would like to know how to screen record a Zoom meeting with audio, I have a superior Zoom screen recorder that will be the best tool for you.
AmoyShare has a never-ending list of helpful products, so feel free to explore what else they offer. It not only let you record Zoom screen as a participant, but also help record Zoom with sound conveniently.
Let me show you how to make Zoom screen recording with audio now!
Before we start, please download the free application to your device that you attend Zoom meetings. Then, install the application by following the prompts. It is 100% safe and free of any ads.
Screen Recorder
Capture HD video and audio instantly
- for Windows 10/8/7
- for Mac OS X 14+
- for Android
- Select recorder
Open the application, and you will see different recording options once it is open. For example, “Video Recorder,” “Audio Recorder,” and “Game Recorder,” select the “Video recorder” button.
- Start Recording
After you select the recording mode, the action will take you to another screen. You will notice a pop-up of an orange square with drag tabs. Drag the tabs to select the custom part of the screen you would like to record or choose the standard size.
Besides, you can enable the system sound, audio, and webcam if necessary.
Next, click the record button, and a countdown will appear.
- Stop Recording
Finally, to stop the recording, click on the square on the bottom of your screen in the screen recorder panel. Alternatively, you can use your keyboard keys for a quicker way to start and stop your screen recordings. Click Ctrl+Alt+R to start/stop your recording.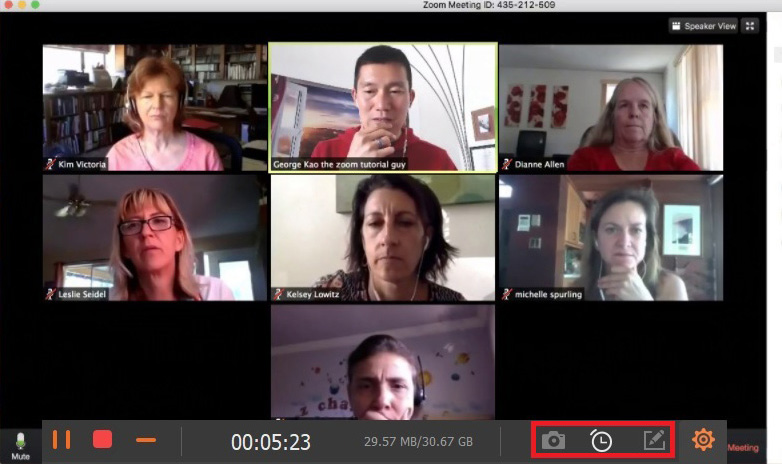
Windows 11 Game Bar
Game Bar is the built-in tool on Windows 10/11. With it, you can record Zoom screen without installing extra app.
- Find the gaming option.
Open the settings tab on your Windows computer. Click on the start button and search in the search bar for Settings. Once open, you will see a panel with a gaming tab. Click on the gaming tab and select the other tab called Captures.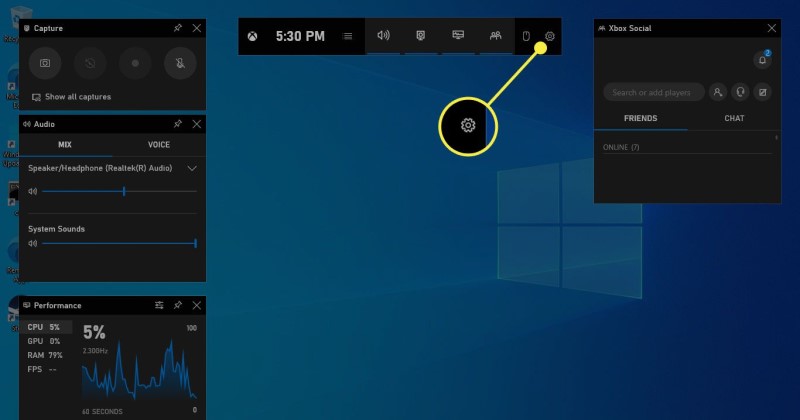
- Change the capture settings
Here you will notice different screen recording options. First, switch on the “Record what happened” tab. This allows you to start recording by clicking on the Windows button+Alt+G, which helps easy access. - Click on the Windows+Alt+G buttons
Once your settings are done, type on your keyboard Windows button+Alt+G. It will bring up a built-in video recorder. There is a panel on the top of the screen. Select the one that looks like a camera. Once you click on the capture button, you will see a bar with a few buttons, and one is a circle, which is the record button. Once you click it, the recording will start and be saved to your desktop.
VLC
VLC is a versatile video player, converter, as well as screen recorder.
Then how to screen record Zoom with VLC easily. Keep reading.
Tips: Learn more about VLC screen capture.
- Open VLC
Open the VLC application on your computer and select the “view” drop-down tab, then click on “Advanced Control” and enable it. You will now notice a play and pause button.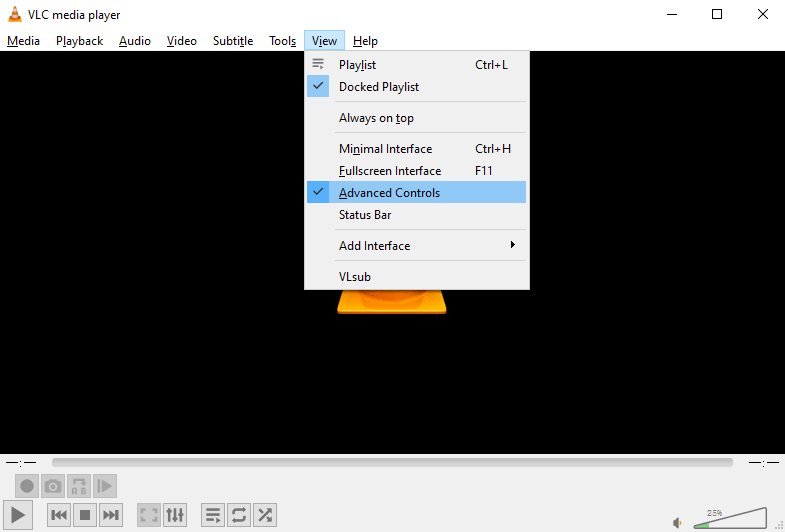
- Capture process
After enabling advanced settings, click on the “Media” tab and “Open capture device.”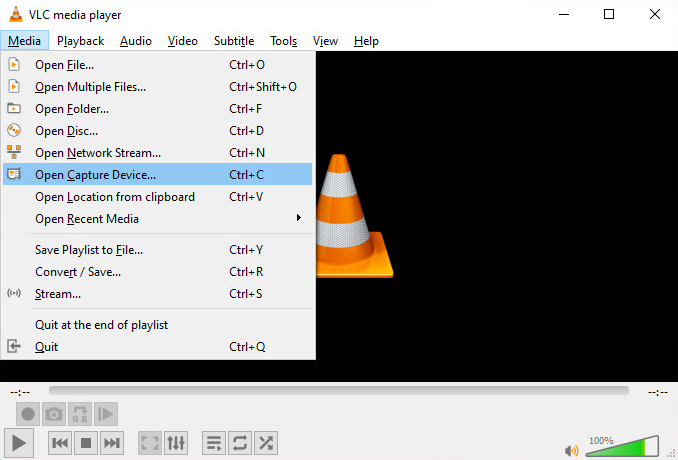
Next, select the “Desktop” button from the drop-down options in capture mode. Then, select the frame rate you would like, such as 30.00 f/s, and click on the “Convert” button that you will see under the “Play” menu. Also, remember to select the profile as “Video-H.264+MP3 (MP4)”.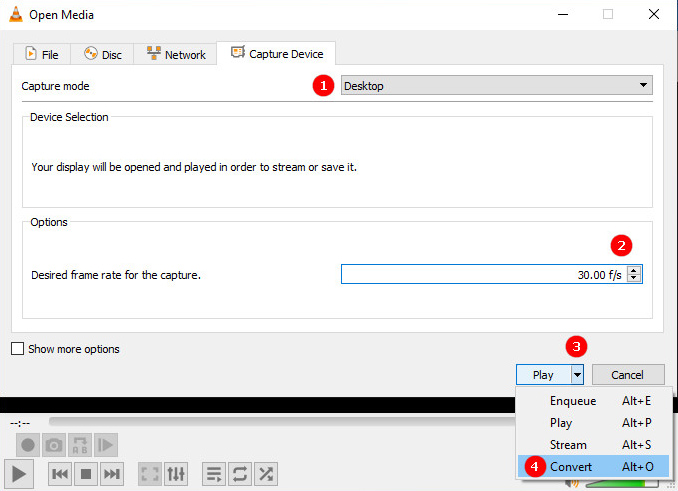
- Select destination and start
After selecting the video profile, click on browse and choose where you would like your files saved and the name. Next, click on “Save” and click on “start” to begin the recording process.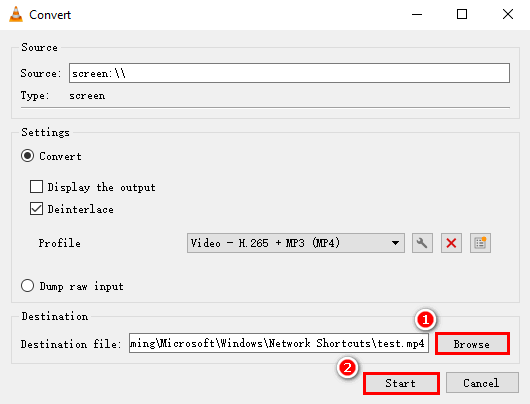
You will see the active record button in the advanced controls. Once done with recording, click on stop.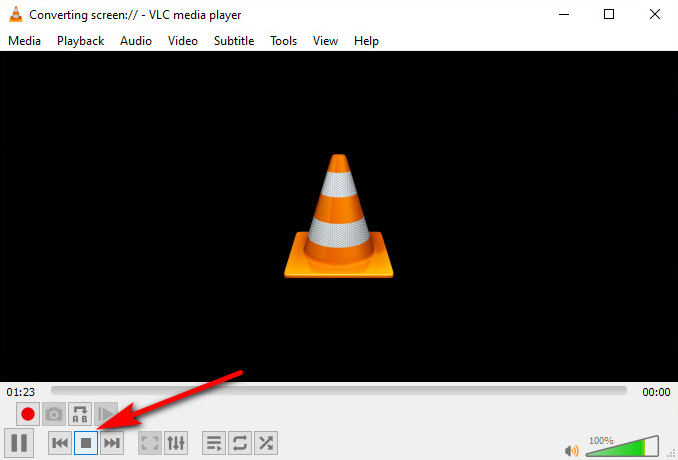
Screencast-O-Matic
- Download and open
Download the Screencast-O-Matic application and open it. Then, click on the “Recorder” button on the right-hand side at the corner of the page. - Click record
You will see a “Launch Screen Recorder” button. Click on it. You will see a notification that says the recorder is being started. - Start recording
You will notice the screen recorder buttons on your computer. Select the record button to start the process.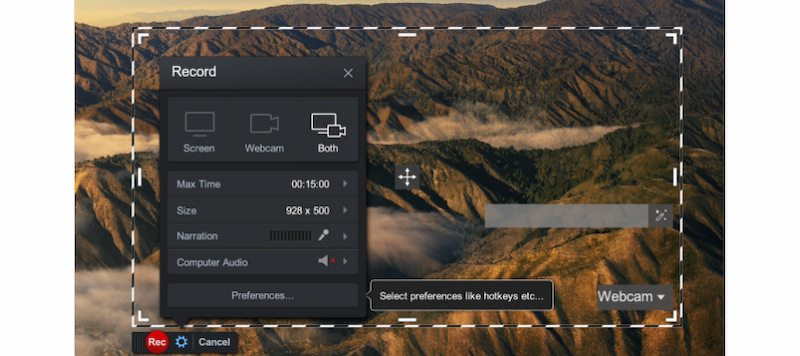
ShareX
ShareX is another application you can use to record Zoom screen, but sadly, this app saves your videos in a less compatible format. In addition, the screen recordings are automatically in FFmpeg format, so you might need to convert them later. Finally, BeeConverter is an excellent tool for converting videos to MP4 format.
- Download and install ShareX
Go to https://getsharex.com/ and download and install the application to your device. Once the app is installed, double-click on the icon and open it. - Select capture mode
Once the application opens, click on the drop-down tab labelled “Capture” on the left sidebar. Select the one with the name “Screen Recording” for video screen recordings. You will need to download an additional application, which is included in ShareX.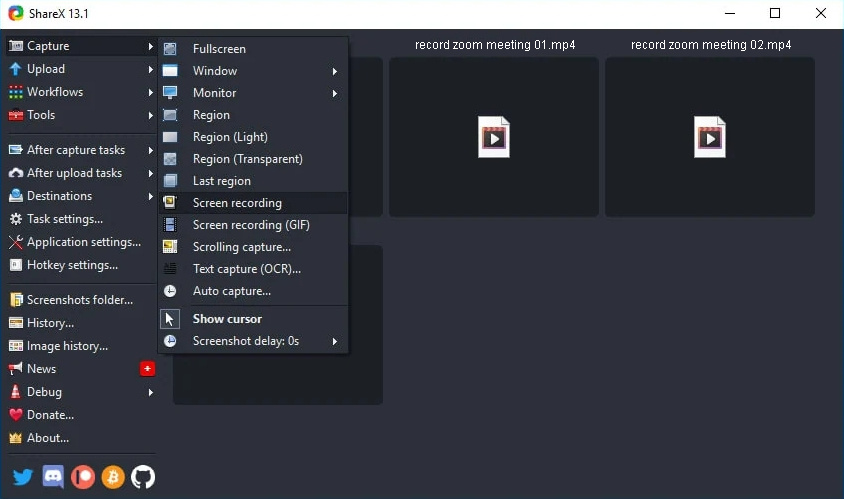
- Select destination and click record
Once you select the screen recording tab, you can choose the destination for your video. You can also use the hotkey to stop and start your recording and click Shift+PrSc.
Final Thoughts
Although many of these screen recorders are free and easy to use, the AmoyShare is the best product for choice when you want to record high-definition Zoon meetings.
AmoyShare is easy to use and has a simple UI that almost anyone can use. So why would you stray from perfection and opt for another Zoom screen recording application?
Screen Recorder
Capture HD video and audio instantly
- for Windows 10/8/7
- for Mac OS X 14+
- for Android
We know that you want to be efficient, and AmoyShare aims to aid you in your everyday life by giving you the necessary tools for video and audio conversions, downloads, and Zoom screen recordings.
Until next time.
FAQ
Will Zoom know If I screen record?
If you use the built-in Zoom recorder, yes, but if you use an external application like AmoyShare Screen Recorder , no participants will know that you are recording.
Can you screen record a Zoom meeting without permission?
Yes, you can record Zoom meeting without permission with a third-party screen recorder . But if you intend on showing it to others, you need to ask permission from participants.
How to screen record Zoom with sound?
You can use AmoyShare Screen Recorder to record multiple Zoom meetings in high-definition with high-quality sound.