Ever since the Nintendo launched Nintendo Switch in 2017, gamers are quick to hustle.
This handy video game console gives its users the technical brilliance of having an incredible 2-in-1 system that allows them to enjoy their games whether they are at home or wherever they go.
The portability that this hybrid device bought for gamers is immensely advantageous. It enables them to play by themselves and share the enjoyable gaming experience with their friends and families, even with their colleagues.
But have you ever wondered why gamers are so fond of Nintendo Switch? Of course, who’s a video gamer wouldn’t want to be Mario, Zelda, or any of their favorite playable characters.
Luckily, gameplay moments can be captured and recorded in an instant.
Yes, you have read it right. You can show your friends, family, and even fans how incredible you are at playing various games. With that said, we outlined 4 best ways you can refer to how to record Switch gameplay.
Part 1: How to Record Switch Gameplay Without Capture Card
The most common way to record Switch gameplay is through its built-in recording tool. This is also the most convenient way for users who are not familiar with assembling capture cards. It is free and requires not much effort since it can be easily done with just a press.
However, this way comes with a drawback, for it will only allow you to record for just 30 seconds.
Although there are still other ways to record Nintendo Switch Gameplay that have no time limit, this is the simplest way, to begin with learning how to record a Switch Gameplay initially. Below is a quick guide on how to record Switch gameplay no capture card.
Best for: It is excellent for short video recordings, especially for gamers who only intend to record winning moments and final seconds of the game.
Key Features:
✔ Allows you to take screenshots from the game video.
✔ Trimming or editing of recorded videos is allowed.
✔ It enables you to view recorded videos and captured screenshots within the Album.
User’s Guide:
- Find the capture button, a square-shaped button located on the left Joy-Con, and placed explicitly under the directional buttons.
- Long-press the Capture Button of this hybrid video game console.
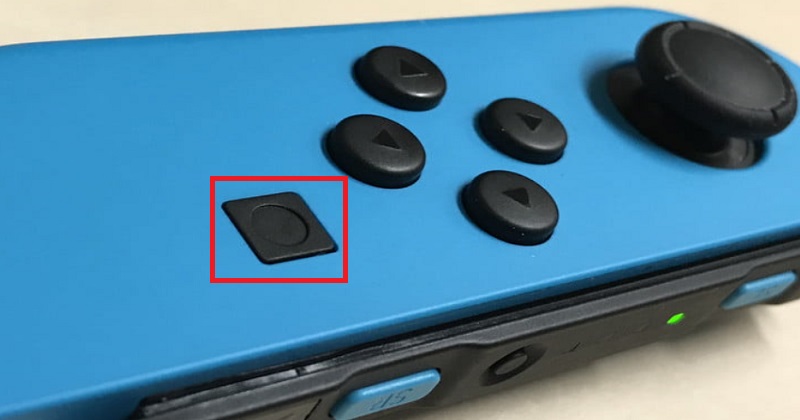
- As soon as the recording process is finished, the recorded videos will be saved and viewed on the Album.
Likewise, Switch Lite also has a capture button which is why this guide is also applicable on how to record Switch Lite gameplay with a time limit.
Part 2: How to Record Switch Gameplay with Capture Card
Even though Nintendo Switch’s built-in capture button allows you to record gameplay for 30 seconds, at some point, it isn’t enough, especially for gamers who like to stream their whole game.
If you are wondering how to record Nintendo Switch gameplay more than 30 seconds by chance, acquiring a capture card will enable you to do so.
It may cost a bit expensive, but it can indeed record your gameplay on Nintendo Switch smoothly and with no time-limitation. Its primary purpose is to allow you to stream from your video gaming console via computer screen or T.V.
Interestingly, it keeps on recording your Switch screen for as long as it is connected to the computer and your Nintendo Switch.
Best for: It ensures users high-quality recorded videos and is best for recording on-screen gameplay content.
Key Features:
✔ It offers high quality for recording and streaming Switch gameplay.
✔ Dual streams can be done for streamers that use dual monitor users.
✔ Easy to set up.
User’s Guide:
- Ready the Capture card together with the HDMI cables. Prepare to plug in the HDMI cable and insert its end on the HDMI out port of your Nintendo Switch and insert the other end to the HDMI in the port of the capture card.
- Correspondingly, plug in the other end of the HDMI cable to the computer and connect it with the capture card.
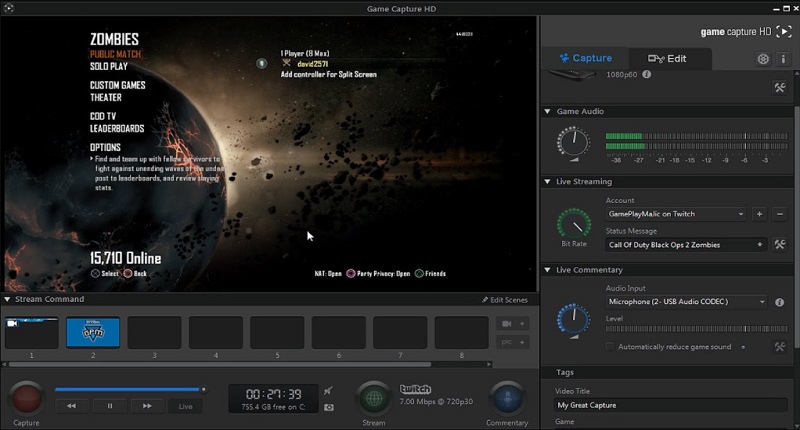
- In this part, you have to install capture card’s associated software that will allow you to configure settings. As soon as the configuration of settings is done, you can now launch the software and record Nintendo Switch Gameplay on your computer without time limitations.
Part 3: Best Way to Record Switch Gameplay in HD on PC and Mac
As mentioned above, you can only record Switch gameplay on PC or Mac by installing a screen recorder, enabling you to capture gameplay moments. Yet, the pre-installed recorder only offers a basic recording function.
If you wish to record Nintendo Switch in HD quality, AmoyShare Screen Recorder comes in handy. This spectacular screen recording software enables you to record any screen without a hassle.
What’s more interesting about this software is its high-definition video encoding technology that can surely give you more precise and concise recorded videos which can be saved in MP4, MOV, WMV, etc.
Aside from screen recording, it also allows you to edit the video in the middle of the recording process. In addition, you can also capture screenshots while recording and editing it as well. Screenshots can then be saved as JPEG, PNG, GIF, and more. Its editing features contain the necessary functions to help you achieve your desired output file.

Best for: AmoyShare Screen Recorder is great for recording any screen and guarantees every user a high-quality resolution from high to lossless video quality.
Key Features:
✔ No watermark.
✔ It has a task scheduler that allows you to record your screen without watching the entire recording process.
✔ Enables you to set record length for screen recording.
✔ Allows you to choose a frame rate from 20 fps to 60 fps.
✔ Extensive settings including video codec, audio and video quality, etc.
User’s Guide: Here’s how to record video on Switch using AmoyShare Screen Recorder.
Screen Recorder
Capture HD video and audio instantly
- for Windows 10/8/7
- for Mac OS X 14+
- for Android
- Install AmoyShare Screen Recorder
- As for gamers or streamers who want to have a high-quality resolution for their recorded Switch gameplay, install AmoyShare Screen Recorder. Click the “Free Download” button above or on the product page. Please wait for the downloading process until it is successfully installed on your computer.
- As for gamers or streamers who want to have a high-quality resolution for their recorded Switch gameplay, install AmoyShare Screen Recorder. Click the “Free Download” button above or on the product page. Please wait for the downloading process until it is successfully installed on your computer.
- Configure Output Settings
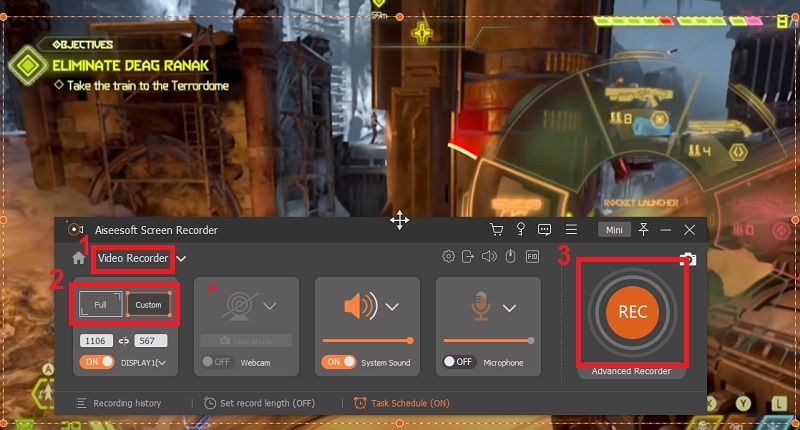
- Once the downloading process is finished, you will see how clean and user-friendly its interface is. Before starting the recording process, click the menu button first. From there, you will see different tabs; click the ‘Output’ tab to configure settings for your desired output file and tap the ‘OK button.
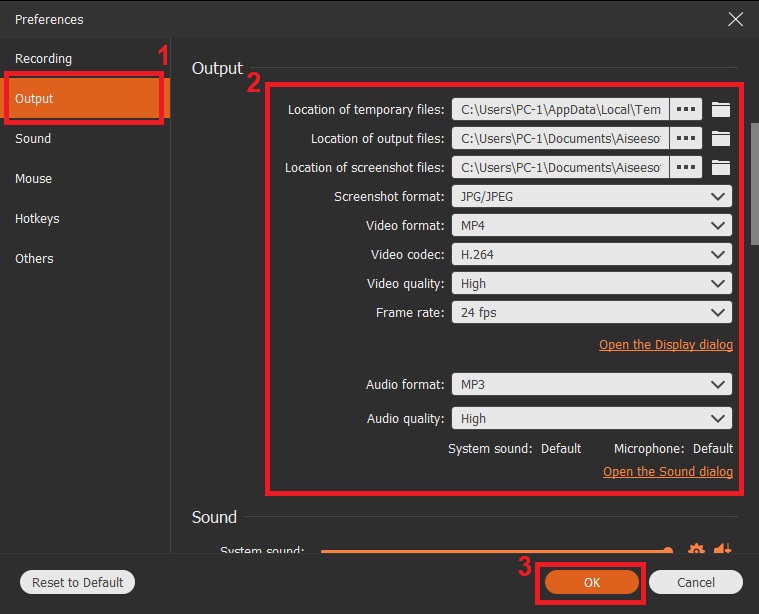
- Once the downloading process is finished, you will see how clean and user-friendly its interface is. Before starting the recording process, click the menu button first. From there, you will see different tabs; click the ‘Output’ tab to configure settings for your desired output file and tap the ‘OK button.
- Start Recording Nintendo Switch Gameplay
- As soon as you have finished configuring output settings, you can now go to your Switch gameplay screen. Start the recording process by clicking the round button with ‘REC’ written on the inside. When the recording process is done, click the red box button to stop the recording.
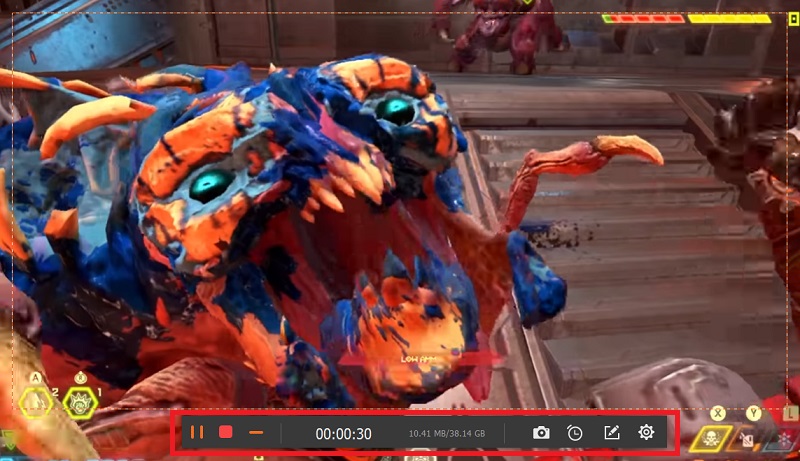
- As soon as you have finished configuring output settings, you can now go to your Switch gameplay screen. Start the recording process by clicking the round button with ‘REC’ written on the inside. When the recording process is done, click the red box button to stop the recording.
- Save the Recorded Switch Gameplay
- Lastly, save the Switch Gameplay has been recorded. Click the ‘Save’ button for it to be automatically saved on your computer. You can now play offline and save recorded Switch Gameplay for later viewing.
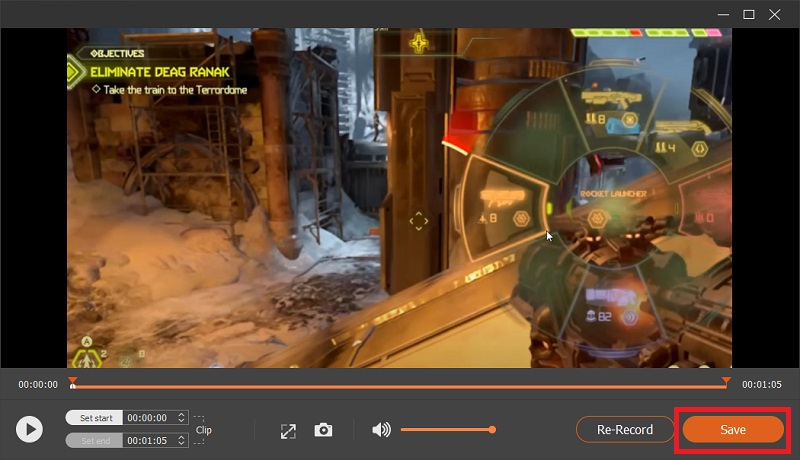
- Lastly, save the Switch Gameplay has been recorded. Click the ‘Save’ button for it to be automatically saved on your computer. You can now play offline and save recorded Switch Gameplay for later viewing.
Aside from PC, AmoyShare Screen Recorder is also applicable to record Switch gameplay on Mac. However, this software’s annotations and adjustment of output formats and quality are still not yet available for Mac.
Part 4: How to Record Switch Gameplay with OBS
OBS Studio is also an excellent open-source screen recorder that enables you to record Switch gameplay.
It supports a variety of output formats, including MP4, MOV, FLV, and more. When it comes to user-friendliness, it is best for advanced users. One of the exciting things about OBS Studio is that it enables you to default files or store all of your input files in this software.
Regarding how to record Nintendo Switch gameplay for free, OBS enables you to do so since it is an open-source screen recorder that also allows you to edit your videos for free. Additionally, it allows you to stream live gameplay easily. Below is a quick walkthrough on how to record Switch gameplay with OBS.
Best for: It is an excellent software with multiple themes and dual functionality such as screen recorder and video editor.
Key Features:
✔ It has an intuitive and clean interface.
✔ Allows you to select hotkeys for smooth navigation.
✔ It enables you to set up unlimited scenes.
User’s Guide:
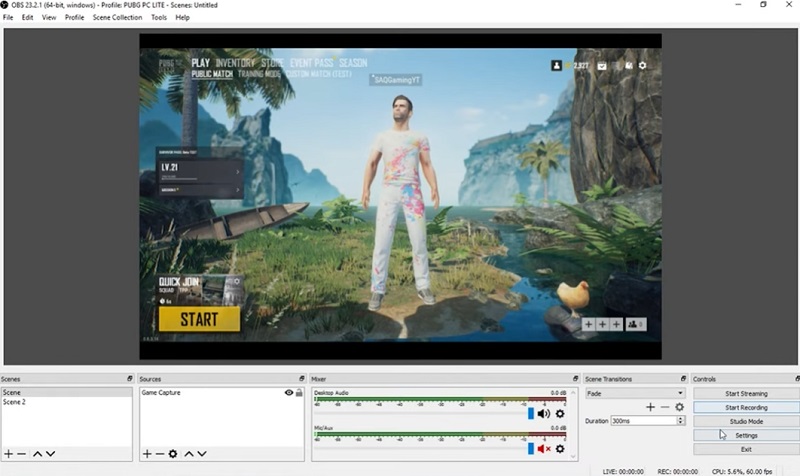
- Right-click on the OBS Studio interface and click ‘Add’. From there, select Video Capture Device.
- Name the new layer that describes the input file. All the media sources that will be added to OBS Studio require an individual unique layer.
- The footage from Nintendo Switch will then appear in OBS Studio. You can now start recording the Switch gameplay by clicking the ‘Start Recording’ button located in the lower-right of OBS Studio.
Frequently Asked Question
How to Record Nintendo Switch Gameplay more than 30 seconds?
Regarding how to record your screen on Nintendo switch for more than 30 seconds, a Capture card is required. After setting up the capture card, install screen recorder software like AmoyShare Screen Recorder and OBS Studio which are best for how to record on Switch. The mentioned software enables you to record Nintendo Switch Gameplay with no time limit.
How Do You Record Gameplay on a Switch without a Capture card?
You can record Switch Gameplay without a Capture card by its built-in capture button. Long-press the Capture button on the left Joy-Con to start recording. You can view them by clicking the album icon however, screen recording cannot exceed 30 seconds.